New to Tilvin? Learn how to create and configure a project in minutes using Tilvin’s intuitive interface — including workflows, users, modules, and more.
Creating a project in Tilvin is simple, fast, and fully customizable. Whether you're managing a client campaign, internal process, or collaborative team effort, Tilvin makes it easy to define project boundaries, task workflows, and team roles — all in a few clicks.
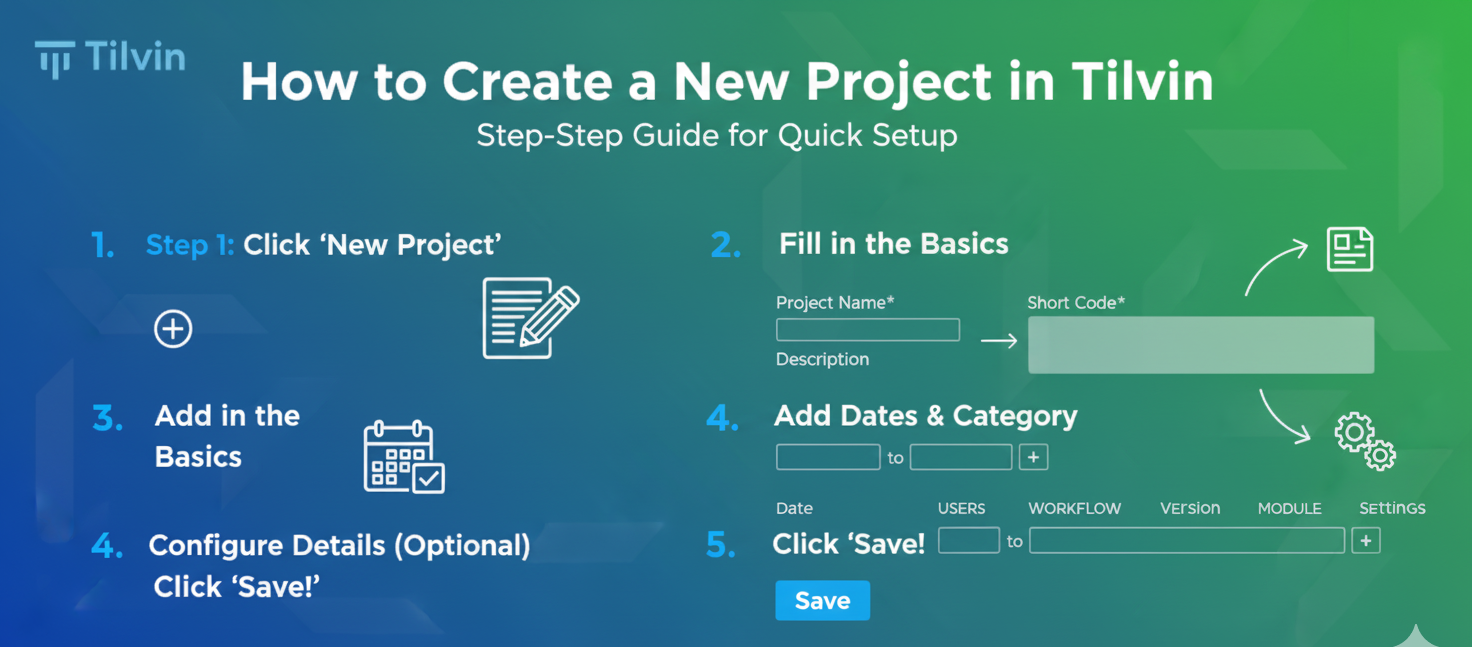
Let’s walk through the full process using the Tilvin project creation interface, with screenshots to guide you.
🟢 Step 1: Go to “Create Project”
From the Projects section, click on the "Create New Project" button. You’ll land on a simple form where you need to fill in:
-
Project Name (e.g., Design Project)
-
Short Code (e.g., DP) — this is used as a quick project reference
-
Description — (optional) brief info about the project
-
Workflow — select from pre-defined workflows like “Default,” or your custom ones under Admin > Process.
At the bottom, you’ll see a visual preview of the selected workflow, such as:
-
Open → In Progress → On Hold → Checked In → QC Testing → Remediation → Closed
This gives you a clear understanding of how tasks will flow in this project.
Click Save to proceed.
🟢 Step 2: Enter Detailed Configuration
Once saved, you’re redirected to the full Project Settings Page, which contains multiple tabs:
-
Details
-
Users
-
Workflow
-
Version
-
Module
-
Settings
Under the Details tab, you can now:
-
Update your description
-
Select the project duration (From – To)
-
Choose a Category or add a new one
Click Save again after filling out the necessary fields.
🟢 Step 3: Assign Users and Roles
Switch to the Users tab to assign team members to this project. You can define who has access and at what level:
-
Admin
-
Contributor
-
Viewer
-
Client
This gives you granular control over who can edit, view, or manage specific areas of the project.
🟢 Step 4: Set or Change Workflow (Optional)
Under the Workflow tab, you can reassign a different task flow to this project — in case the default doesn’t match your current process.
🟢 Step 5: Attach Modules or Versions (Optional)
Use the Module and Version tabs to link additional information if your project structure involves sprints, feature groups, or delivery modules.
✅ And That’s It!
You’ve now created a fully structured project in Tilvin — complete with users, workflows, timelines, and categories.
You’re ready to start adding tasks, tracking progress, and collaborating with your team.
🧠 Pro Tip:
Want to define your own process stages? Go to Admin > Process to create custom task workflows, then assign them to projects during creation.
🚀 Get Started with Tilvin Today
Try it yourself and bring order to your project chaos.
👉 https://www.tilvin.com/Account/SignUp